Flex Offense Origin
Before we get into how to run the flex offense, let’s have a quick look at its history in the game of basketball.
The flex offense was created as a variation to the shuffle offense in the 1970’s by Carroll Williams of Santa Clara University.
There are many coaches that have had success with the flex offense including Gary Williams of Maryland who won the 2002 NCAA championship using the flex offense, Bo Ryan at Wisconsin, Al Skinner at Boston College, Jerry Sloan variations of it during his time with the Utah Jazz, not to mention hundreds of high school coaches across the country.
As you can see, the flex offense has been proven to work at all levels of basketball. It is a staple offense among many high school teams.
What is a Flex Cut
Let’s start with the absolute basics.
Since the offense is named after this cut, it’s important that every coach reading this has knowledge of the flex cut before we get deeper into breaking down the offense.
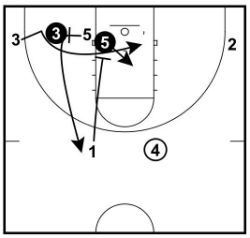
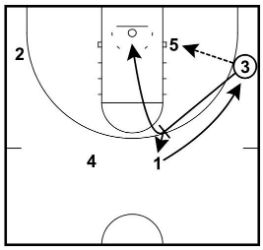
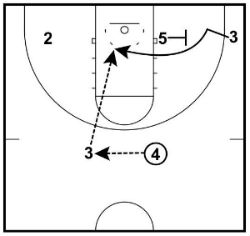 A flex cut is when a player in the corner receives a screen from a teammate leading them into the paint where they can receive a pass for a layup or shot close to the hoop.
You can see an example in the diagram. The player cutting can cut either side of the screener depending on the location of their defender.
It’s important that this cut is practiced often by your players as it’s a massive part of the offense and once the players learn how to read their defender, the flex cut will lead to a lot of scoring opportunities.
Overview of the Flex Offense
The flex offense is a 4-out, 1-in continuity offense that primarily uses down-screens in a screen-the-screener action and the famous ‘flex cut’ to get open layups or jump shots around the high post. It’s primarily a man-to-man offense, but can be used against a zone with some slight adjustments.
It’s a slow-down, patient offense that requires good spacing, ball-movement, passing, shooting, cutting, and screening by all players.
It’s common to see teams reverse the ball to different sides of the court three or four times before creating an open shot at the basket.
Who Should Use the Flex Offense?
Every team from middle school (about age 11) and up can run the flex offense.
Too often I hear “I can’t run the flex offense with my team, my bigs can’t dribble or pass to save themselves!”. My reply usually is something like “When have they had the opportunity to learn how to dribble and pass?”
If your only concern is winning basketball games, then this offense should only be run by a team of players who ALL excel at passing, dribbling, cutting, screening and shooting, as all positions are interchangeable. It’s tough (closer to impossible) to find a team of players that good at the middle and high-school level.
The flex offense doesn’t allow you to give the basketball to your best scorer and let them go one-on-one every trip down the floor while the weaker offensive players are hidden in the corners. Every player must be involved.
Coaches looking to use this offense have to remember that we can’t expect our players to be perfect at all these skills before we implement the offense.
By implementing the flex offense you’ll gradually develop complete players by experience and they’ll learn the fundamental skills of all areas and positions on the basketball court.
With that said, while I think the offense can work for any youth team, there is obviously going to be teams that are more suited to this offense.
1. Teams lacking height – If your team doesn’t have a great low-post player or much height, this is a good offense because it creates constant movement from all players on the floor.
2. Great shooting teams – This is a great offense for a team in which all players can shoot from the outside. If you have players that can’t, it allows the defense to sag into the paint and cut off passing lanes.
3. Teams with a high basketball IQ – All players running the flex offense will develop a higher basketball IQ, but it definitely helps if you’ve got smart players from the start.
Advantages of the Flex Offense
Easy to Learn – The reason the flex offense is so popular among high school programs is because it’s relatively simple to learn.
Everyone Develops and Contributes – The flex really is a TEAM offense. Unlike most youth teams, you can’t rely on one player handling the ball for most of the shot clock and the same players shooting each time down the floor. Everyone is involved in the offense.
Positionless Basketball – The flex offense requires all 5 players to be interchangeable. This leads to all players being comfortable playing anywhere on the floor and developing skills and confidence for all positions.
Fatigue the Defense – The Flex offense often takes up a lot of the shot clock in search of an open shot, the defense is forced to guard for long stretches on defense. As they’ll be constantly fighting through screens and continually moving, this can really wear down the opposition.
Control Tempo – When you run the flex offense you dictate the speed of the game. You’ll slow the game down instead of playing a run-and-gun game against a superior team.
Great Mis-Matches – A common defensive tactic against the flex is to switch on all screens. If used correctly, this is fantastic for the offense as it will often lead to mis-matches in dangerous areas of the floor.
Develops Complete Players – It’s all too common in youth basketball to see players limited to their position. The bigs screen, the guards handle the ball, etc. In the flex offense all players must learn and develop all areas of their game. Bigs must learn how to drive, small players must learn how to play in the post, guards must learn how to screen, etc.
Less Dribbling – If there’s one basketball skill that’s overused in youth games it’s dribbling. The flex offense doesn’t allow players to over-dribble. If a player dribbles in the flex offense it’s with a purpose.
Many Entries – There are many entries into the flex offense which disguises it from the defense until you’re already in it.
Disadvantages of the Flex Offense
Predictability – The biggest downside of the flex offense is its predictability. The opposition team will know where you’re going to cut, who you’re going to screen, and what spots on the court you want to get shots from. Although this doesn’t necessarily mean they’ll be able to stop the offense as there are many alternate actions to counter with.
Too Many Passes – In youth basketball, the more your team passes, the more chance they have of turning the ball over.
Teams Will Play Zone – One of the easiest ways to defend the flex offense is to simple play a zone defense. If allowed, a lot of teams will switch to this early on in the game and the flex coach must know how to counter.
All Players Must Be Able to Shoot – All of your players must be able to shoot from outside. If they can’t, it’s easy for the defense to sag into the lane and cut off passes that should be easy scores.
Going Through the Motions – One of the hardest things for players to learn in the flex offense is when to go for the score. Players can get so caught up in where to move and pass next that they forget the main objective of offense is to put the basketball in the hoop.
Setting Up the Flex Offense
The first thing you must learn is the basic flex offense continuity. This is the core of the offense and all entries, counters, corner options, sets, and variations will develop from this.
The basic flex continuity is designed to get open shots from two areas on the court:
1. A layup off the flex cut.
2. A jump shot from around the high post.
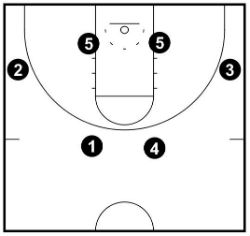 During the basic flex offense, there are 6 spots on the court that should always be filled by a player.
There must always be two players at the top of the key, there must always be two players on the wing, and the last player should be on either low block depending on where the basketball is and which part of the offense the team is up to.
When teaching the offense to a new team, I highly recommend placing 6 flat cones on the court in these 6 different spots.
The Basic Flex Continuity
The offense begins with two players at the top of the key, two wing players, and a low-post player on the strong-side of the court.
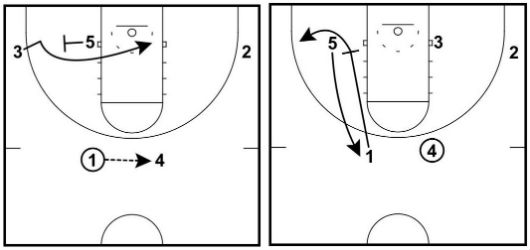
- The offense starts when the player with the basketball (1) passes across court to (4).
- This pass triggers the flex cut from (3) who is screened by (5).
- After (5) screens for (3), (1) now sets a down-screen for (5) (screen-the-screener action) to pop to the top of the key.
- (1) steps out and (3) becomes the new post player.
Important to remember: The flex cutter (3) can cut either side of the screen set by (5) depending on how the defense is playing them.
This is half a rotation. Let’s switch the ball back to the other side of the court so that you make sure you understand it…
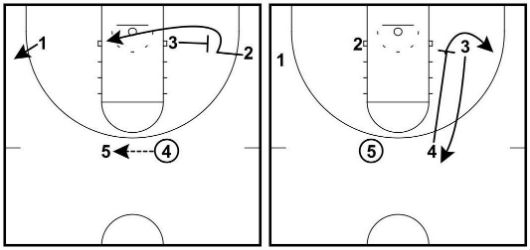
- (4) makes the guard-to-guard pass to (5) which triggers the flex cut.
- The new post player (3) screens for (2) to make the flex cut to the ball-side block looking for an easy layup.
- (4) now down-screens for (3) who pops up to the top of the key looking to receive the ball for the open shot.
- We’re now back at the very start of the flex offense and have had many great opportunities for an open shot.
Why is this simple action so effective?
The reason this action is so effective is because the defender of the player flex cutting will find it extremely difficult to defend it on their own. Most of the time they will need help from the defender of the player setting the flex screen to stop an easy layup.
 While this person is helping stop the flex cutter, they’re being screen as the player they’re defending is cutting to the top of the key or flashing to the ball. This forces the defense to make a decision… do I help on the cutter or do I stay with my player?
These are very tough actions to stop. Especially because these actions can be run 3 or 4 times on a single possession until a breakdown in the defense occurs.
Entries into the Flex Offense
Now that you know the basic flex continuity, let’s look at how to get into the flex offense. One of the best things about the flex is there are many ways to disguise it from your opponents.
I recommend your team use one of the entries below after a time-out or out-of-bounds to easily flow into the flex offense.
Throughout the game it’s easy enough to run straight to the flex positions. Players must communicate and be aware as they’re sprinting down the court so they set up quickly.
Entry 1: 1-4 Low
There’s two ways of entering flex through the low 1-4 entry. By passing to the post player or passing to the wing. Let’s take a look at both…
Low 1-4 – Post Option
This entry starts with both bigs on the block and two wing players. The point guards brings the ball down the middle of the floor and picks a side to dribble to. When the point guard dribbles to a specific side, the opposite post player cuts hard to the top of the key and receives the ball from the point guard. Now we’re in flex.
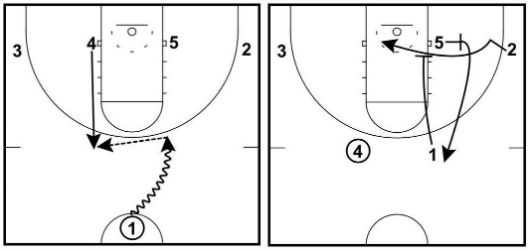
Low 1-4 – Wing Option
The entry starts in the same way. The point guard brings the ball down the court and picks a side of the floor. The opposite post player flashes high but is covered so instead the point guard passes to the wing. When this happens, the ball-side post player comes up and sets screen so the point guard can UCLA cut to the block. If the pass isn’t on to the point guard the wing players passes to the top of the key and we’re in flex.
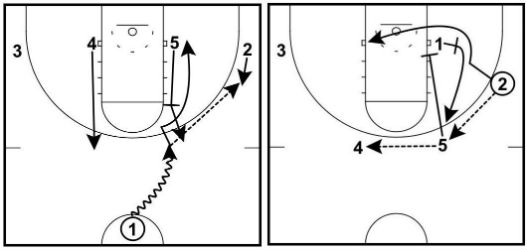
Entry 2: Box Entry
Using this entry the four off-ball players start in a box format. As the point guard is dribbling down the floor the two players beginning on the high post step out and the point guard passes to one of them. After passing the point guard immediately cuts through to the ball-side corner. As the point guard is cutting, the weak-side high post sets a down-screen for the player on the weak-side low post to pop out and receive the basketball. Now we’re in flex.
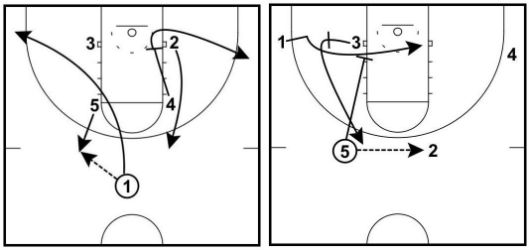
Entry 3: High 1-4
There’s two ways of entering flex through the high 1-4 entry. By passing to the post player or passing to the wing. Let’s take a look at both…
High 1-4 – Wing Option
We start this entry in a high 1-4. The point guard passes to either wing player and then makes a UCLA cut off the ball-side post player to the block. If the pass is on, make it. If not, the basketball is rotated and we’re now in flex.
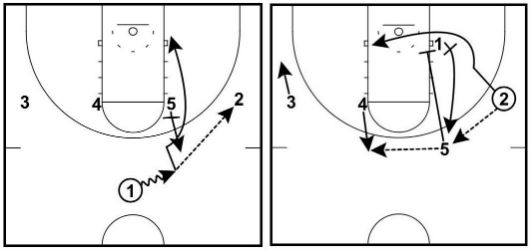
High 1-4 – Post Option
Instead of passing to a wing player one of the post players step out off the high post and receives the pass. This triggers the other post player to cut to the ball-side low block and the point guard steps into their position. The pass is immediately made back to the point guard and we’re in flex.
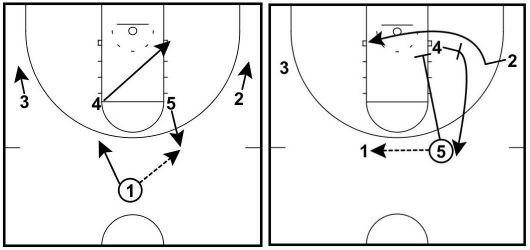
Entry 4: From BLOB
Here are a couple of plays if you want to get into the flex offense straight away from the baseline out of bounds.
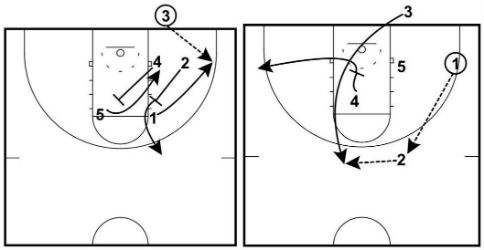
BLOB Play 1
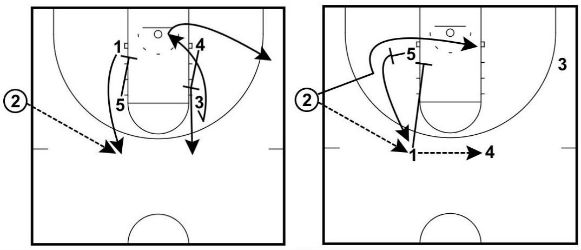
In the first BLOB play, players line up as shown in the diagram. Both low players set diagonal screens and the post player cuts to the block while the guard cuts to the wing to receive the basketball. After making the pass the inbounder cuts off the post player screen to the top of the key. The guard steps out and the basketball is rotated. We’re now in flex.
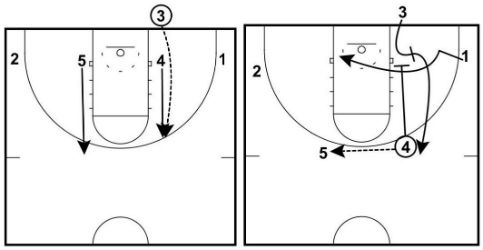
BLOB Play 2
Players begin in a low 1-4 set. When the inbounder slaps the ball the closest post player uses his body to shield the defense and receive the lob pass over the top. When this is made the other post player cuts to the top of the key as well. We’re now set up for flex as the guard-to-guard pass is made at the top and the inbounder steps in the court to set the flex screen. Now we’re in flex.
Entry 5: From SLOB
Here is my favorite play if you want to get into the flex offense straight away from the sideline out of bounds.
SLOB Play
Players start in a box set. When the inbounder slaps the ball the closest high player down-screens for a guard to pop to the top and receive the pass. When this pass is made the other high post player fakes to receive the pass and receives a back-screen from the low weak-side player. If the lob to the ring isn’t on, then the screener steps out to receive the ball and the cutter goes to the wing. We’re now in flex.
Corner Options of the Flex Offense
The basic continuity involves the top two players passing back and forth in search of open players to pass to for the shot.
We must give the players the option to pass to the corner if they need to.
As the constant guard-to-guard pass is predictable, a common method of opposition coaches to stop the flex offense is to completely deny this pass. If you don’t have corner options, then as soon as this pass is denied your flex offense will come to an immediate stop!
There are many variations you can run off the pass to the corner. I’m going to share with you 5 options. My advice is to pick 2 or 3 of them to use for your team and have a code word for each that is called out on every pass to the corner.
Don’t try to implement all 5 options or your players will never learn. It would be more beneficial for your team to master 2 or 3 options.
Quick Note: On the corner pass the post player should always post up for 1-2 seconds to see if the entry pass into the post is open. Perimeter players must hold their position for these 1-2 seconds.
Option 1: Give and Go
This is the easiest action to learn and an action I’ve seen young teams run but doesn’t produce a great scoring opportunity. Rather, it’s just to release pressure and then get back into the basic flex offense.
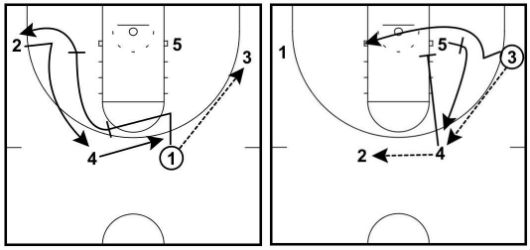
After passing the ball to (3) in the corner, (1) cuts through the key to the opposite baseline as the other two perimeter players rotate towards the basketball before getting back into flex.
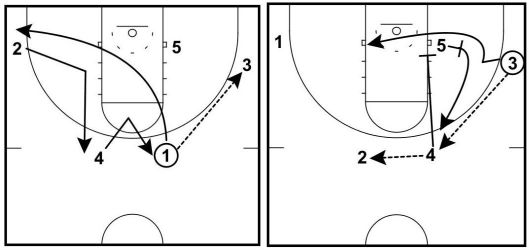
The problem with this option is that there’s no opportunity to pass to the cutting players since (5) is already on the post and there will be too many defenders. But it is an option to use for young teams.
Option 2: UCLA Cut
Another easy option is as soon as the ball is passed to the corner by (1), (5) steps up and sets a screen for (1) to UCLA cut to the block. If the corner player doesn’t pass to (1) on the UCLA cut then (3) can pass to (5) as they pop out and we’re back in flex. On the opposite side of the court (4) sets a down-screen for (2) who cuts to the top of the key.
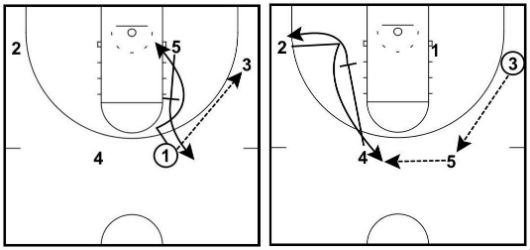
Option 3: Dribble Entry
Instead of passing to the corner the player with the basketball can dribble to the corner to get out of trouble. As the player is doing this they call out a key word like ‘dribble!’ and the corner player curls around the low post and pops out to the top of the key for the pass. Now we’re back in flex.
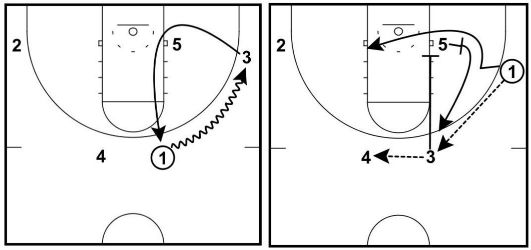
Option 4: Single Screener
The player that passes the basketball to the corner becomes the screener on the play. First, (1) sets a cross-screen for (4) who replaces (1)’s spot, and after (4)’s defender has made it around the screen, (1) immediately sets a down-screen for (2) to cut and replace (4)’s position. After both screens (1) ends up in the opposite corner. Now we’re back in flex.
Option 5: Staggered Screen Option
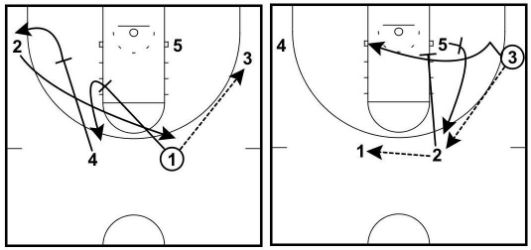
In this option both high players (1) and (4) set a staggered screen for the weakside corner player (2). (2) uses this staggered screen and cuts all the way to the ball-side looking for a shot. (1) steps back and becomes a high player while (4) becomes the corner player. Now we’re back in flex.
Option 6: Horizontal Screens
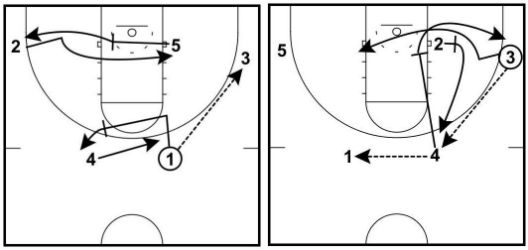
As the ball is passed into the corner, both ball-side players cross-screen for both weak-side players. Both screeners must hunt the defender and set a solid screen. If the cutter through the lane isn’t open the ball is passed back to the top and we’re now in flex.
Getting the Ball into the Post
Due to the 4-out, 1-in setup of the flex offense and all the screening and switches that take place, it’s a great offense to get the basketball into the post and let your players go to work.
When your team is already in the offense, I encourage players to keep an eye on the inside match-up and if it’s to our advantage then toss the ball inside and let the player go to work.
The best time to pass into the post is after a pass to the corner as we don’t like passing the ball into the post player from the top of the key.
To stop the defense collapsing on the post player and trapping the post, I’ll share with you a few options that will force the perimeter defenders to stick to their players and will allow your post player to go one-on-one.
As you’ll see in the next two options, nothing needs to be called out after a feed into the post. It’s the passer that dictates which option will be used so the perimeter players must read what they do and adjust.
Option 1: Cut Through and Rotate
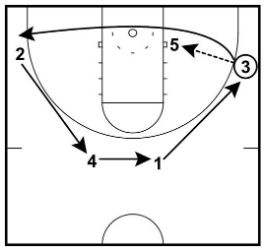 On the feed into the post from the wing player, unless the post player makes an immediate move, the passer cuts through to the opposite wing and all perimeter player rotate one spot around.
The passer can cut either side of the post player and the post player should look for the short pass/hand-off if it’s open.
Cutting around the perimeter forces all defenders to stay with the offensive player they’re guarding.
If they don’t, this is a great opportunity for a back-door cut and easy pass to score.
Option 2: Screen Ball-Side Guard
 On the feed into the post the passer chooses to screen the ball-side guard at the top of the key. This keeps the closest defenders to the post occupied playing off-ball defense at the risk of allowing an open outside shot.
The ball-side guard should come off the screen looking for a catch-and-shoot from the post player and the screener can open up to the ball looking for the shot or back-cut to the ring depending on how the defense plays the screen.
If the screener does opt to take the back-cut option, the two weak-side players rotate around as the cutter fills the weak-side corner.
How to Counter the Defensive Tactics
There are a few common tactics coaches use to attempt to stop the flex offense. We’re going to go through the two most common tactics and give you ways to work around them.
1. Deny the Guard-to-Guard Pass
This is the main tactic coaches use to stop the flex offense in it’s tracks. If the offensive team can’t make the guard-to-guard pass (which triggers the flex cut and down-screen), then the offense stops. Luckily for us, there are a few alternatives.
1. Backdoor Cut
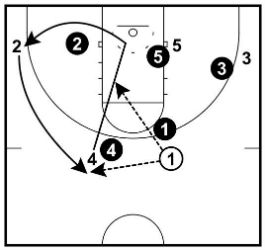 If the guard-to-guard pass is being overplayed then the player can execute a back-door cut.
The back-door cutter must explode towards the ring and not hesitate. Players should never fake the back-door cut.
When this happens the player in the corner rotates up and receives the basketball while the cutter takes their place in the corner.
2. Dribble Exchange
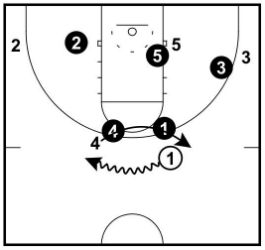 If the guard-to-guard pass can’t be made, another option is to simply exchange spots by the player with the basketball dribbling up and around while the player being denied banana cuts underneath.
This exchange triggers the flex action.
Some coaches like to screen across but I’d rather stay away from the congestion and have found it just as easy to simply exchange positions.
2. The Defense Switches All Screens
One of the best ways to defend the flex offense is by switching screens. This allows the post player to stay close to the basket and the guards to play defense on the perimeter.
Here’s a few ideas on how you can counter the switching defense…
1. Duck in on flex screen
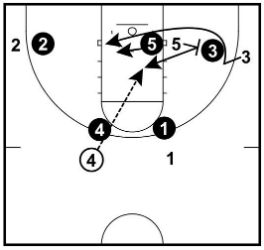 On the flex cut, O5 will screen X3 and X5 will be forced to help out on O3 to prevent the open layup.
When this happens, O5 should seal off on X3 and duck in with high hands to receive the pass.
This forces X5 to deny O3 and O5 at the same time or the offense will get a layup in the paint.
This tactic leads to a lot of fouls and free-throws.
2. Isolate on mis-matches
This is important to remember… When the opposition is switching on all screens the offensive team gets to pick who guards who.
Depending on who their weaker players are, take the time to work out how you can get your best players in positions they’re comfortable in being guarded by the oppositions weaker players.
This requires pre-match planning and knowledge of the other teams’ players.
3. Down-screen own player
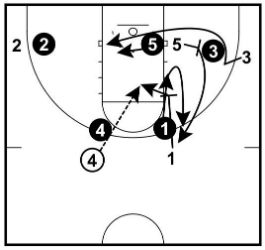 When running the down-screen action of the flex, have the player setting the down-screen screen their own player instead.
Depending on how low they follow the perimeter player down, you can set a down-screen or a flare screen for the shot. When the player fights through, quickly flash to the ball.
4. Be patient
A simple tip but very important. After a couple of ball-reversals you can be sure the defense is going to make a mistake. Two defenders will get confused and accidentally end up on one offensive player. It happens all the time!
Your players must be patient and wait for this to occur and then be ready to make the most of it when it does happen!
5. Start with point guard in the post
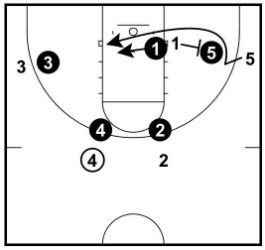 As teams will usually begin in their match-up before they start switching, consider starting with your point guard in the post instead of the post-player. That way when players switch you’ll end up with one of your post players posting up the oppositions point guard.
As you can see in the image, we’ve immediately ended up with the defending point guard trying to stop our post player in the paint.
Conclusion
Ask anyone that’s played against the flex offense, you might know where the screens are coming from, but they’re still very difficult to guard. If the defense cheats, there are many options for the offensive player to counter that we’ve talked about in the article.
In my opinion all players that run the flex offense will come out better players with a much higher basketball IQ.
The only trap you must be aware of is that your players don’t become robots in the offense. Screening where they’re meant to screen and passing where they’re meant to pass without ever looking at the basket or even considering attacking.
If you can keep them in attack mode and seeking potential scoring opportunities, this can be a fantastic offense for all levels of basketball beyond middle school.


